
End User Instructions (Windows)
Important Information:
The New Outlook for Windows does not currently support opening or viewing PST files. To access a PST file, you must temporarily switch to Classic Outlook.
Step 1: Switch to Classic Outlook
1. Open Outlook.
2. In the top right corner, locate the toggle labeled “New Outlook.”
3. Turn the toggle OFF.
4. Outlook will close and automatically reopen as Classic Outlook.
Or
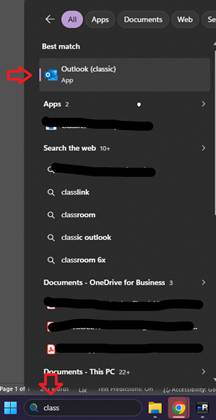
5. You can manually search for the Outlook Classic version that is installed on every computer.
Step 2: Add the PST File
1. In Classic Outlook, click File in the top menu.
2. Select Account Settings, then click Account Settings again.
3. Click the Data Files tab.
4. Click Add.
5. Browse to the location of your .pst file.
6. Select the file and click OK.
Step 3: Access Your PST Data
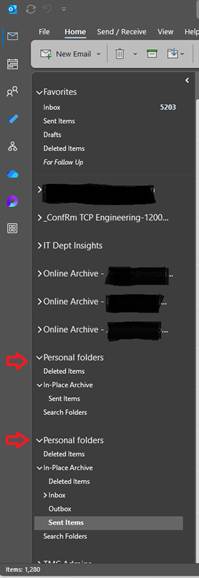
Your PST file will now appear in the folder list on the left side of Outlook. You can expand it to view emails, folders, calendar items, and contacts.
Step 4: Cleanup Process
You’ll want to delete the archives once you’ve retrieved the historical emails required. This cleanup will help you clear storage to avoid hitting the maximum OST cap which prevents you from using Outlook.
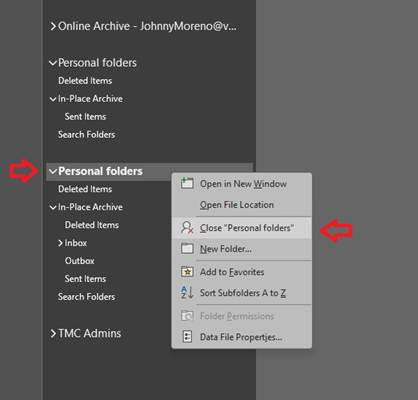
- Right click the main inbox name > Select Close “Personal Folders”
Once the added archive is no longer required and or used, close from the classic outlook version. You can now start using the New Outlook version for normal email interactions.
Optional: Switch Back to New Outlook
You may switch back to New Outlook at any time using the same toggle. Please note that PST files will not be visible in New Outlook, but they remain safely connected in Classic Outlook.
Quick Summary
• PST files cannot be opened in New Outlook.
• Classic Outlook is required to add and view PST files.
• Switching between Outlook versions does not remove or delete the PST file.